CHARLEY ROBERTSON'S
9812-A
COCHITI S.E.
ALBUQUERQUE, NM
87123
505-292-5532
800-326-5632 Fax 505-292-2592

Click Here to view a in depth presentation using the Score High Adjustable Pillar bedding System.
|
Fiberglass bedding any rifle can be quite complicated. Our adjustable pillar system will greatly simplify the process. If you have any doubts at all in your ability to install the pillar bedding system, have it installed by a competent gunsmith. For a better understanding let’s discuss just exactly what it is we are trying to accomplish. During the course of firing, vibrations travel the length of the barrel and action. They are produced by everything from the falling of the firing pin, to the detonation of the primer, to the bullet going down the barrel. Our goal is to eliminate these vibrations, and vibrations we cannot eliminate as consistent and repeatable as possible. As recoil is produced, certain components shift, flex and compress. To insure that all this happens exactly the same way each time, we need to take a look at how the action sets in the stock. When we tighten the guard screws we must insure that we don't exert any stress on either the stock, action or barrel. This stress is detectable by guard screws that tighten gradually. If nothing can bend or compress, the screws will stop solid. We can create a stress free fit by having all our major components at rest while in an assembled |
state. From there, fill all of the space between our components with a liquid epoxy. Epoxy in its liquid state imposes no force on any component, but when it hardens all components are as one. The trick is to attach everything together without exerting any stress. The stock of a rifle, whether it is made from wood, laminated wood or a synthetic material, can be compressed when the guard screws are tightened. Keeping this stock compression in mind, what happens to our stress free fit? If our stock changes even just a little bit, it pulls on the action causing it to flex, undoing everything we have worked so hard for. Aluminum pillars machined to mate between the action and the trigger guard will eliminate any possible compression. In a since what we are doing is putting the brunt of the load on rock solid pillars, then attaching our stock to these pillars. The single most important quality our pillar bedded rifle must have is that all of its components are at rest, whether the trigger guard screws are loose or tight. If you always keep this in mind as you are bedding your rifle, you will no doubt realize its full potential.
|
STEP ONE
A. Make sure the gun isn't loaded by use of a visual inspection
B. Carefully look over the kit contents, it should contain:
1- Long, radius pillar with a threaded adjusting post: All kits
1- Short, radius pillar with a threaded adjusting post: All kits
2- 1/4 x 28 female threaded "T" handle: Deluxe & Gunsmith kit
2- 1/4 x 28 x 2 inch socket set screws: Deluxe & Gunsmith kit
1- Pro-Bed 2000 bedding compound: Deluxe kit only
1- Paste wax for release: Deluxe kit only
C. Carefully read all installation instructions thoroughly before doing any work.
D. Check the function of the rifle. The safety should work properly and have a positive snap from the On to the Off position. The trigger should move freely and not make any contact with the trigger guard. Check the bolt handle to make sure it doesn't touch the stock.
E. Check the stock to metal fit. Make a notation as to any gaps you want to fill. If your stock has a barrel channel much larger than your barrel, you may want to fill it in.
A. Remove all of the accessories, sling, scope, bipod ect.
B. Make sure the barrel is free floated. There should be enough room between the barrel and forend to slide about four thicknesses of note book paper all the way back to the recoil lug. If it is not free floated, free float it now.
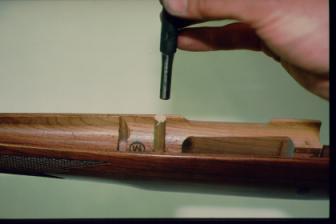
C. Bore a 5/8 inch diameter hole for both the front and rear trigger guard screw. These holes must be as close to a right angle to the bore as you can get. We offer a stock drilling jig that will bore perfect holes every time or a drill press and a 5/8 inch diameter piloted counterbore works, with a little extra care a hand drill and 5/8 spade bit can be used. Piloted counter-bores are available from machine tool supply companies or can be ordered from us. To use a spade drill you need to first plug the original holes with a wooden dowel (Fig # 1). Drill a hole .003 to .005 inches smaller than a 5/16 or a 3/8 inch diameter wooden dowel so that the dowel is a compressed fit. Glue can be used in case the hole gets oversize and won't hold the pin. Once plugged, you can use the 5/8 inch diameter spade drill.
For Remington 700 BDL models with hinged floor plate.
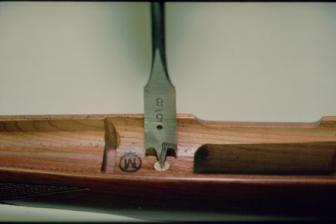
1. Place the stock right side up and drill straight down all the way through the stock. Be careful not to let your drill touch the sides of the trigger guard inletting ( Fig # 2 ).
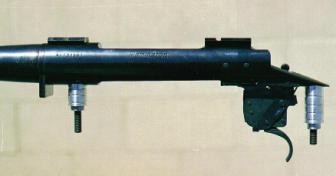
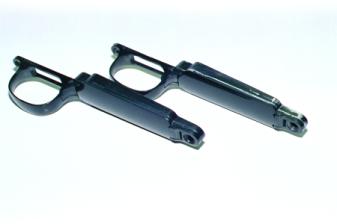
2. The pillar set comes with two pillars, one short and one long. Use the 1/4 x 28 socket head retaining screws to attach the short pillar to the front guard screw hole and the long pillar to the rear ( Fig # 3 ).
3. As you tighten the pillars to the action rotate them side to side until they are firmly seated. DO NOT OVER TIGHTEN.
4. The barreled action with the pillars installed should slide smoothly into the stock. It is absolutely imperative that the pillars are free from any pressure from the stock. This almost never happens without final fitting. With a rat tail file or a chisel, remove the stock material hanging up on the pillars.
5. After the holes have been properly inletted, insert the barreled action into the stock. Turn it upside down so that you can now see the bottoms of the pillars.
6. Holding the barrel and action firmly in the stock, use a small screw
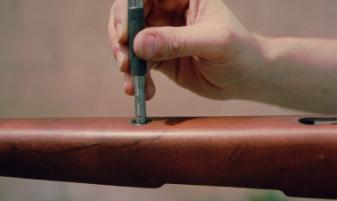
driver to rotate the adjustment post of the front pillar so that it is flush or slightly higher than the level of the stock.
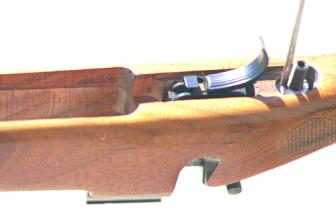
7. Now move to the rear pillar. The bottom of the adjusting post is at a 2 1/2 degree angle to match the angle of the trigger guard. Adjust the post by rotating it full revolutions so that the slot is length wise to the barrel with the black mark towards the muzzle and it is flush or slightly higher than the stock ( Fig # 5 ).
8. With the magazine and trigger in place, slide the trigger guard over the retaining screws and tighten it down with the "T" handles. The "T" handles should tighten firmly, there should not be any mushy feeling to them at all.
9. The rifle is now fully assembled with the pillars in place. Check to see that the stock is firm to the action. Our goal is to have the trigger guard tighten up on the pillars, not the stock. If the stock has just a little bit of play, this is fine.
10. Loosen the "T" handles one at a time. There should not be any movement of the barreled action in the stock. If there is movement then the, pillars are not properly adjusted.
11. Check the trigger and the safety, there should be adequate clearance to function properly. The magazine box should not be under any pressure and should move up and down slightly.
12. Remove the "T" handles and disassemble the barreled action from the stock. You should be able to reassemble the barreled action without the stock to further check the pillar adjustment and magazine and trigger clearance.
13. Go to paragraph D of step two.
Remington 700 ADL. and other stocks without hinged floor plates.
1. Place the stock right side up and with a 5/8 inch counterbore or spade drill, drill straight down all the way through the rear guard screw hole.
2. Now drill down the front guard screw hole until it hits the steel stock screw escutcheon ( Fig # 2 ).
3. Turn the stock upside down in the vise and with a large punch drive the escutcheon through the hole and out the top ( Fig # 4 ). By driving it out in this manner you reduce the chance of breaking the stock by driving it out the bottom.
4. After glass bedding the escutcheon must be removed. This makes it necessary to relieve the stock so that the escutcheon can be easily reinstalled from the bottom. Don't relieve it too much it still needs a small amount of friction to stay in place while bedding.
5. The pillar set comes with two pillars, one short and one long. Use the 1/4 x 28 socket head retaining screw to attach the short pillar to the front guard screw hole and the long pillar to the rear ( Fig # 3 ).
6. As you tighten the pillars to the action rotate them side to side until they are firmly seated. DO NOT OVER TIGHTEN.
7. The barreled action with the pillars installed should slide smoothly into the stock. It is absolutely imperative that the pillars are free from any pressure from the stock. This almost never happens without final fitting. With a rat tail file or a chisel, remove the stock material hanging up on the pillars.
8. After the holes have been properly inletted, insert the barreled action into the stock. Turn it upside down so that you can now see the bottoms of the pillars.
9. Holding the barrel and action firmly in the stock use a small screw driver to rotate the adjustment post of the front pillar so that it is at the approximate level of the top of the steel escutcheon.
10. Now move to the rear pillar. The bottom of the adjusting post is at a 2 1/2 degree angle to match the angle of the trigger guard. Adjust the post by rotating it full revolutions so that the slot is length wise to the barrel with the black mark towards the muzzle and it is flush or slightly higher than the stock.
11. With the magazine and trigger in place, install the steel escutcheon over the front retaining screw and tighten with one of the "T: handles. Slide the trigger guard over the rear retaining screw and tighten it down with the other "T" handle. The "T" handles should tighten firmly, there should not be any mushy feeling to them at all. Never tighten the middle screw.
12. The rifle is now fully assembled with the pillars in place. Check to see that the stock is firm to the action. Our goal is to have the trigger guard tighten up on the pillars, not the stock. If the stock has just a little bit of play this is fine.
13. Loosen the "T" handles one at a time.. There should not be any movement of the barreled action in the stock. If there is movement then, the pillars are not properly adjusted.
14. Check the trigger and the safety, there should be adequate clearance to function properly. The magazine box should not be under any pressure and should move up and down slightly.
15. Remove the "T" handles and disassemble the barreled action from the stock. You should be able to reassemble the barreled action without the stock to further check the pillar adjustment and magazine and trigger clearance.
D. Now we need to remove stock material to accommodate the bedding compound. This can be done a number of different ways. I like to remove allot of stock material from around the lug area so that the recoil lug will bear on something solid. I also remove material from under the front receiver ring. When removing material from here be sure to leave a small amount of the original inletting on each side of the pillar. This helps keep the barreled action aligned during bedding. Around the rear pillar you only need to scrape off the stock finish so that the stock bedding compound has something to bond to. Sometimes the compound doesn't stick as well to stock finish, for this reason I like to scrape off all of the stock finish where ever I expect to have glass bedding. After relieving the stock, reassemble the barreled action and stock. It should fit just as it did before. If your stock has a wide gap between the barrel and forend , and you want to fill it, use two inch wide heavy duty electrical tape and apply it to your barrel length wise. Use two or three thicknesses. Check again with note book paper to see that your barrel is still free floated with the tape installed and make any necessary alterations.
STEP THREE
A. Remove the pillars being careful not to change their adjustment. Next remove the trigger assembly. Quite often, especially on the BDL trigger guards, the mold flashing on the sides is excessive. This flashing makes it difficult to remove after bedding and can even cause damage to the stock. With a file remove the flashing so that the sides are smooth ( Fig # 6 ). Place 3 or 4 layers of cellophane tape on the bottom of the recoil lug and trim off the excess with a sharp knife or
razor blade. Fill the trigger assembly pin holes with modeling clay. Apply paste wax to all the metal parts, barrel, action, trigger guard and pillar retaining screws according to the bedding compounds manufactures instructions. Do not apply any release agent or wax to the pillars. The clean up job will be much easier with release agent or wax applied to certain parts of the stock's inletting. Apply to the sides of the magazine well and to the sides of the trigger inletting. Be very careful not to get any release agent or wax on any part of the stock area that will come into contact with the receiver. Now reassemble the pillars to the barreled action and be careful not to change their adjustment.
B. Thoroughly read the instructions that come with your bedding compound and mix the kit at this time. Place the stock in a vise and apply the mixture to the sides of the 5/8 holes and also where you removed its original bedding and to the barrel channel if required. With the wooden mixing stick, apply a liberal coat of compound to the outside of the pillars. Place the barreled action with the magazine box and pillars attached, into the stock. Wipe or scrape off any excess epoxy that oozes out the top. Now turn the rifle upside down holding it in the vise by the barrel. Apply the compound around the pillar's adjusting post. With a small screw driver unscrew the adjustment post in the pillar four complete revolutions so the threads are covered with compound. Now screw the adjusting post down exactly the same number of revolutions to its original position. Place the trigger guard over the attaching set screws, retain it with the "T" handles. In the case of the ADL type stocks install the steel escutcheon and the trigger guard. DO NOT OVER TIGHTEN THE “T” HANDLES they should only be tight enough to hold the trigger guard against the bottoms of the pillars. Clean off all excess resin from the out side of the stock. Be sure to get off all finger prints. After the compound hardens it cannot be cleaned off with out damage to the stock finish. Place the stock right side up in the vise for at least 48 hours to cure.
STEP FOUR
A. After forty eight hours, check the left over compound, it should be hard. Before removing the barreled action from the stock check all the edges of the stock where it meets the metal. Any compound that has run over the edge needs to be removed. Any left will break off and parts of the stock will break off with it. Remove the "T" handles and the trigger guard. With a 1/8 hex key unscrew the retaining screws. With the stock firmly in a vise partially insert the bolt in the rifle and use it as a handle to raise the barreled action out of the stock. Use a rocking motion pulling up on the barrel then the bolt handle until it breaks loose. After the barreled action is removed from the stock use a fine file to clean up the edges. On the inside of the stock around the trigger and magazine box any over run resin should pop right off because we previously had applied release agent to this area. Clean all of the metal and completely reassemble. Check the trigger and safety to make sure they move freely and function properly. Check for stress by loosening and tightening the trigger guard screws. The barreled action should not move at all. The screws should tighten solid. Allow the compound to completely cure. You are now ready to go to the range and enjoy the benefits of your efforts.
|
FIG # 1 |
FIG # 2 |
|
FIG # 3 |
FIG #4 |
|
FIG # 5 |
FIG # 6 |